Apple provides UINavigationController class for managing multiple views of data in a hierarchy. This lets developers provide simple, yet powerful means of navigation between different screens in their apps. Most apps on the app store uses UINavigationControllers for navigation within the app.
UINavigationController manages views by arranging them inside a stack. The top most view in the stack is the one which is visible. The RootView, which is the first view in the stack does not have a back button whereas all the other views either have a back button or the title of the previous view in the stack in the place of the back button.


The screenshot above is how the navigation bar of a RootViewController looks. As we can see, there is no back button. The second screenshot shows “Settings” in the place of the back button as “settings” is the title of the RootViewController
Following are the steps that we will be covering in our tutorial,
- Creating a Window based application.
- Add a UIViewController to the project.
- Initialise a UINavigationController with the above UIViewController as its root view controller.
- Set the UINavigationController as root view controller to the main window.
- Add a second UIViewController to the project.
- Add a UIButton to the first UIViewController and when the button is pressed, the second UIViewController is pushed.
UINavigationController Example
Create an empty application in XCode with the name “NavigationSample”. By default, when you create a project in XCode, the device family is set to “Universal”. Change the device family to iPhone. Though you can create a UINavigationController based application from the interface builder, for this tutorial, we will create the navigation controller in code.
Once you create the project, you will notice two files namely AppDelegate.h and AppDelegate.m in the project. These files are created automatically. Now we need to add the two UIViewControllers we discussed earlier to the project. Right click on the project and select “New File”, select “Objective-c class” and click next.
In the next screen, type “FirstViewController” in the class text box and choose “UIViewController“ from the subclass of dropdown. Also tick the “with xib for user interface” checkbox and click next. In the next screen, select “NavigationSample” in the “Group” drop down box and click on the create button to add the UIViewController to the project.
Repeat the same steps and add another UIViewController named “SecondViewController” to the project. Now we will see how to set up the main window in code. Modify the code in the “AppDelegate.h” as shown below
#import <UIKit/UIKit.h>

@interface AppDelegate : UIResponder <UIApplicationDelegate>

@property (strong, nonatomic) UIWindow *window;

@property(nonatomic, retain) UINavigationController *navController;

@end
In the above code, we have created a property for an instance of UINavigationController. We will set the root controller for this object in “application didFinishLaunchingWithOptions” of “AppDelegate.m” file as shown below,
#import "AppDelegate.h"

#import "FirstViewController.h"

@implementation AppDelegate

@synthesize navController;

- (BOOL)application:(UIApplication *)application didFinishLaunchingWithOptions:(NSDictionary *)launchOptions

{

self.window = [[UIWindow alloc] initWithFrame:[[UIScreen mainScreen] bounds]];

// Override point for customization after application launch.

self.window.backgroundColor = [UIColor whiteColor];

UIViewController *cont=[[FirstViewController alloc]initWithNibName:@"FirstViewController" bundle:nil];

self.navController=[[UINavigationController alloc]initWithRootViewController:cont];

[self.window setRootViewController:navController];

[self.window makeKeyAndVisible];

return YES;

}
In the above code, we have imported “FirstViewController.h” in the imports section. Then synthesize the “navController” property we created earlier. We then create an instance of “FirstViewController“ and set that as root view controller when we create an instance of “UINavigationController“ in the next line. Then set “navController” as root controller for main window.
We are half way through now as we have set up the navigation controller and hooked up FirstViewController as root to the navigation controller. Now click on “FirstViewController.xib” in project navigator and add a UIButton as shown in the screen shot below.

Now open “FirstViewController.h” and modify the file as follows,
#import <UIKit/UIKit.h>

@interface FirstViewController : UIViewController

@property(nonatomic, retain) IBOutlet UIButton *clickMeButton;

-(IBAction)clickMeAction:(id)sender;

@end
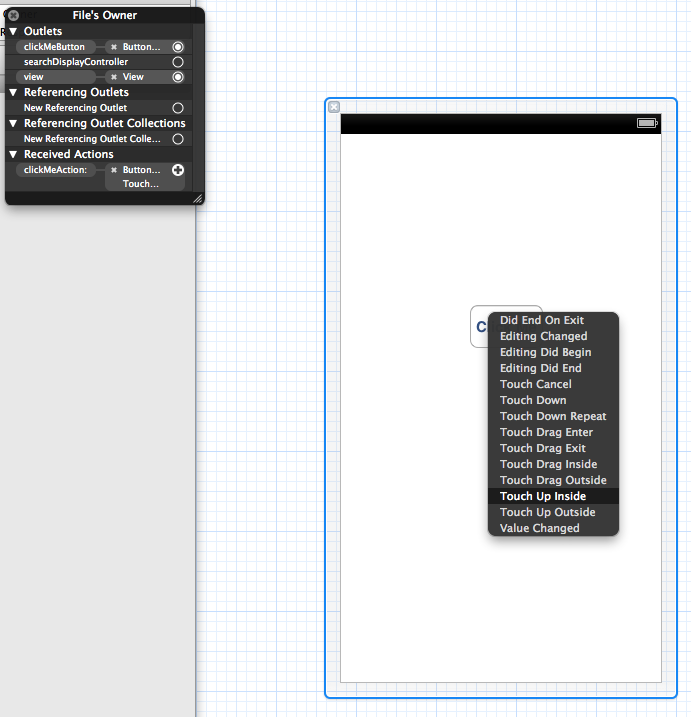
In the above code, we create an UIButton object and also add an IBAction event to listen to click events of the button. Then click on “FirstViewController.xib” again, right click on the “File Owner” object and hook up the button we added, to the object we created and the IBAction function as shown below,

Once this is done, we need to add implementation of the click function in “FirstViewController.m” file.
#import "ViewController.h"

#import "SecondViewController.h"

@interface ViewController ()

@end

@implementation ViewController

- (id)initWithNibName:(NSString *)nibNameOrNil bundle:(NSBundle *)nibBundleOrNil

{

self = [super initWithNibName:nibNameOrNil bundle:nibBundleOrNil];

if (self) {

// Custom initialization

}

return self;

}

- (void)viewDidLoad

{

[super viewDidLoad];

// Do any additional setup after loading the view from its nib.

[self setTitle:@"RootView"];

}

- (void)didReceiveMemoryWarning

{

[super didReceiveMemoryWarning];

// Dispose of any resources that can be recreated.

}

-(IBAction)clickMeAction:(id)sender

{

UIViewController *sec=[[SecondViewController alloc] initWithNibName:@"SecondViewController" bundle:nil];

[self.navigationController pushViewController:sec animated:YES];

}

@end
As you might have noticed by now, we need to import “SecondViewController.h” in the imports section as that is the view controller we will be pushing when the button is clicked. In the “viewDidLoad” method, we are just setting the title for this view to “RootView”. Then we write the implementation of button click in “clickMeAction” method.
We create an object for “SecondViewController” and the below line of code does the trick of pushing the second view to the top of the stack i.e, visible area of the screen.
[self.navigationController pushViewController:sec animated:YES];
Now click on the “SecondViewController.m“, as just set the title to “SecondView” in the “viewDidLoad” as demonstrated in the code below,
- (void)viewDidLoad

{

[super viewDidLoad];

// Do any additional setup after loading the view from its nib.

[self setTitle:@"SecondView"];

}
The final output will look like the screen shots below,

The above image show the root view controller and as we can see, the navigation bar does not have a back button. Once we click on the “Click Me” button, the navigation controller pushes the second view to the visible area as shown in the screen shot below. As we can see, the back button says “RootView” instead of “back”. This is because we are setting the title for the views in the “viewDidLoad” method for each view. If we hadn’t set the titles, then the back button would just say “back”


Thank you. This was really useful for me 🙂
superb simple tutorial
Thanks for this comprehensive and clear tutorial!
Really easy to do…Thank you soo much
This is the really awesome.
Thanks for the update here.